When it comes to home organization, combining function with personality is key — and one of the best ways to do that is by creating stylish shelves made from old drawers. Whether you’re decluttering, redecorating, or just love upcycling, this DIY project turns unwanted furniture into charming, functional wall décor.
In this guide, you’ll learn how to repurpose drawers into attractive shelving units using simple tools and a touch of creativity.
Why Use Old Drawers for Shelving?
Repurposing drawers as shelves isn’t just trendy — it’s also smart and sustainable. Here’s why it’s worth a try:
- Eco-friendly: Reduces landfill waste by upcycling existing materials.
- Cost-effective: No need to buy new shelves — reuse what you already have.
- Unique design: Each drawer has character and potential to become a one-of-a-kind piece.
- Flexible function: Works in bedrooms, bathrooms, kitchens, hallways, and more.
- Beginner-friendly: Requires minimal tools and experience.
What Types of Drawers Can You Use?
Almost any drawer will work, but the best choices are:
- Wooden drawers from old dressers, nightstands, or desks
- Sturdy construction with minimal damage or warping
- Flat backs for easy wall mounting
- Drawers with character (vintage hardware, unique shapes, or carved details)
Tip: Mismatched drawers can be grouped together for an eclectic, shabby-chic look.
Tools and Supplies You’ll Need
Before you begin, gather these basic materials:
- Old drawer(s)
- Sandpaper or sanding block
- Paint or wood stain (optional)
- Screwdriver or drill
- Screws or wall anchors
- Brackets (optional for added support)
- Measuring tape and level
- Paintbrush or foam roller
- Decorative paper or wallpaper scraps (optional)
- Clear sealant (optional)
Step-by-Step: How to Make Stylish Shelves from Old Drawers
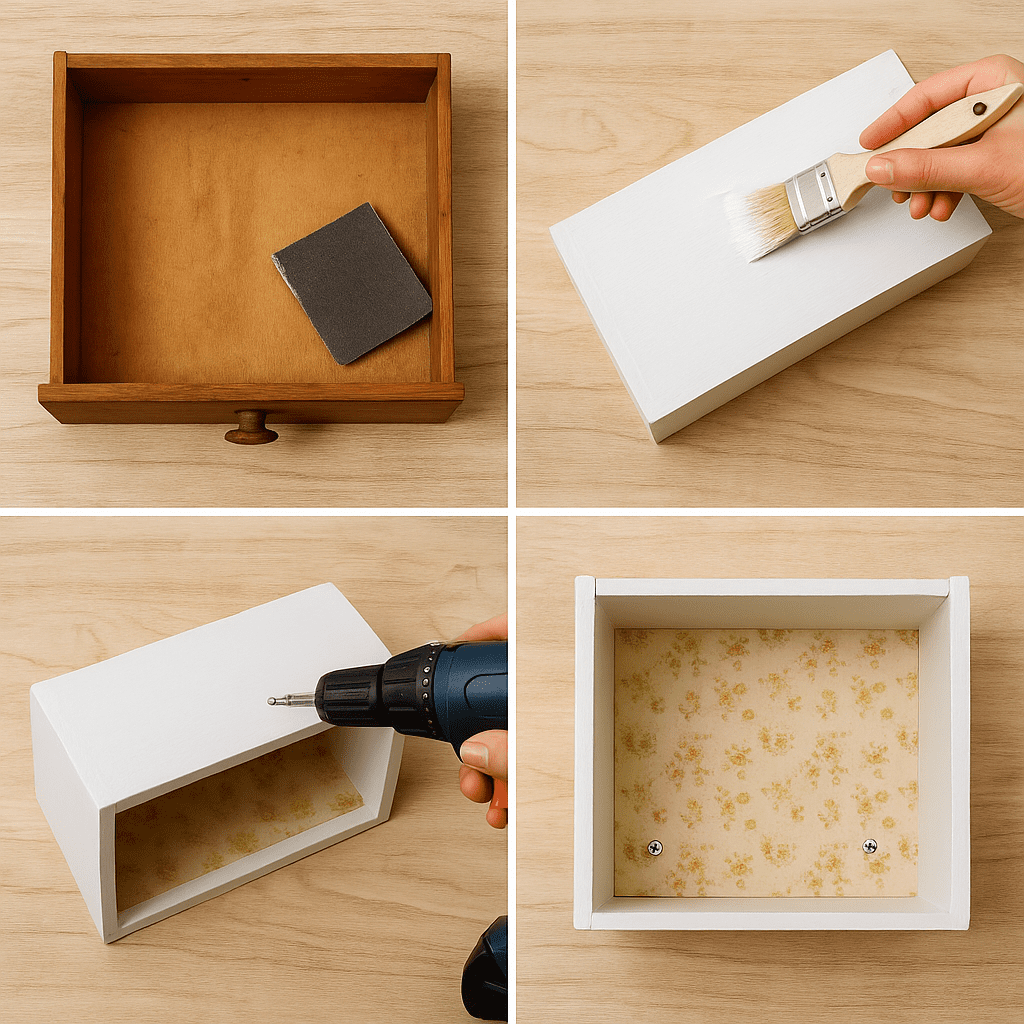
Step 1: Clean and Prep the Drawer
- Remove any old liners, dirt, or debris.
- Tighten loose joints and remove handles if necessary.
- Lightly sand the entire surface — inside and out — to smooth rough spots and prep for paint or stain.
Step 2: Choose Your Finish
- Paint: Choose neutral tones for a modern look or bold colors for a pop of personality.
- Stain: Highlight the wood grain with natural finishes like walnut, oak, or cherry.
- Wallpaper or Fabric Lining: Add flair to the drawer’s interior with adhesive wallpaper or fabric glued to the back.
Let everything dry completely before moving on.
Step 3: Decide Shelf Orientation
You can mount drawers in different ways depending on your style and space:
- Flat (back to wall): For shadow-box or cubby-style shelves.
- Sideways (like a bookshelf): Good for deep storage.
- Upright (on legs or brackets): Create a standing shelf unit.
Mark where the shelf will be placed and make sure it’s level before drilling.
Step 4: Mount to the Wall
- Use a stud finder or wall anchors for secure placement.
- Drill screws through the drawer back or attach L-brackets for additional support.
- For heavier drawers, distribute weight with multiple screws or toggle bolts.
Creative Styling Ideas
Once your drawer shelf is mounted, it’s time to decorate! Here are some ideas:
- Mini Library: Store books, magazines, or journals.
- Bathroom Organizer: Hold toiletries, towels, or small jars.
- Entryway Catch-All: Keep keys, wallets, and mail tidy.
- Kitchen Shelf: Display mugs, spices, or herb pots.
- Bedroom Accent: Use as a nightstand alternative or art display.
Design Tip: Mix and match drawer sizes and finishes for a gallery-wall effect.
Where to Place Your Drawer Shelves
Drawer shelves are incredibly versatile and fit into almost any room:
- Hallways
- Mudrooms
- Craft rooms
- Kids’ rooms
- Home offices
- Living rooms
Hang multiple at different heights or orientations for visual interest.
Where to Find Tools or Accessories
Need sandpaper, wall anchors, or paint? Shop recycled-friendly home improvement supplies on Amazon to complete your project with ease.
Try This Related Upcycling Project
Want more smart ways to reuse what you already have? Check out our easy tutorial on how to make recycled mason jar centerpieces — perfect for organizing or decorating shelves just like these!
Want a fun project to do with the kids while you craft your own shelf? Check out our list of egg carton crafts for children for creative and sustainable ideas.
Conclusion: Functional Décor with Personality
Making stylish shelves made from old drawers is a satisfying DIY project that blends sustainability, practicality, and creativity. Whether you go rustic, minimalist, or boho, each shelf will reflect your unique taste — all while saving money and reducing waste.
Save this guide for your next home project — or share it with a friend who loves clever DIY transformations!
FAQ: DIY Drawer Shelf Projects
Q1: How much weight can a drawer shelf hold?
It depends on the mounting method and wall type. When using wall anchors and screws properly, most drawer shelves can hold 10–20 lbs safely.
Q2: Can I stack drawers instead of mounting them?
Yes! You can create standing shelf towers by stacking and securing drawers with wood glue or screws.
Q3: Do I need to remove the drawer handle?
Not necessarily. Some people leave it for visual interest or to hang items like keys or towels.
Looking for paint, sandpaper, or wall-mounting supplies for your drawer shelf project? Browse affordable DIY materials on Amazon to get started with ease.
Written by Kate Smith | Upcycling Enthusiast & Interior DIY Guide