Creating DIY toy cars from plastic bottles is a fun and sustainable way to engage children in hands-on play while promoting eco-friendly habits. This creative activity uses common household materials, helping reduce plastic waste and providing kids with a personalized toy they can build themselves.
Why Use Plastic Bottles for DIY Toys?
Plastic bottles are lightweight, durable, and readily available. Repurposing them into toys reduces environmental impact and teaches kids the value of recycling. They also offer a versatile base for different toy car designs.
Materials You’ll Need
Before you begin, gather the following items:
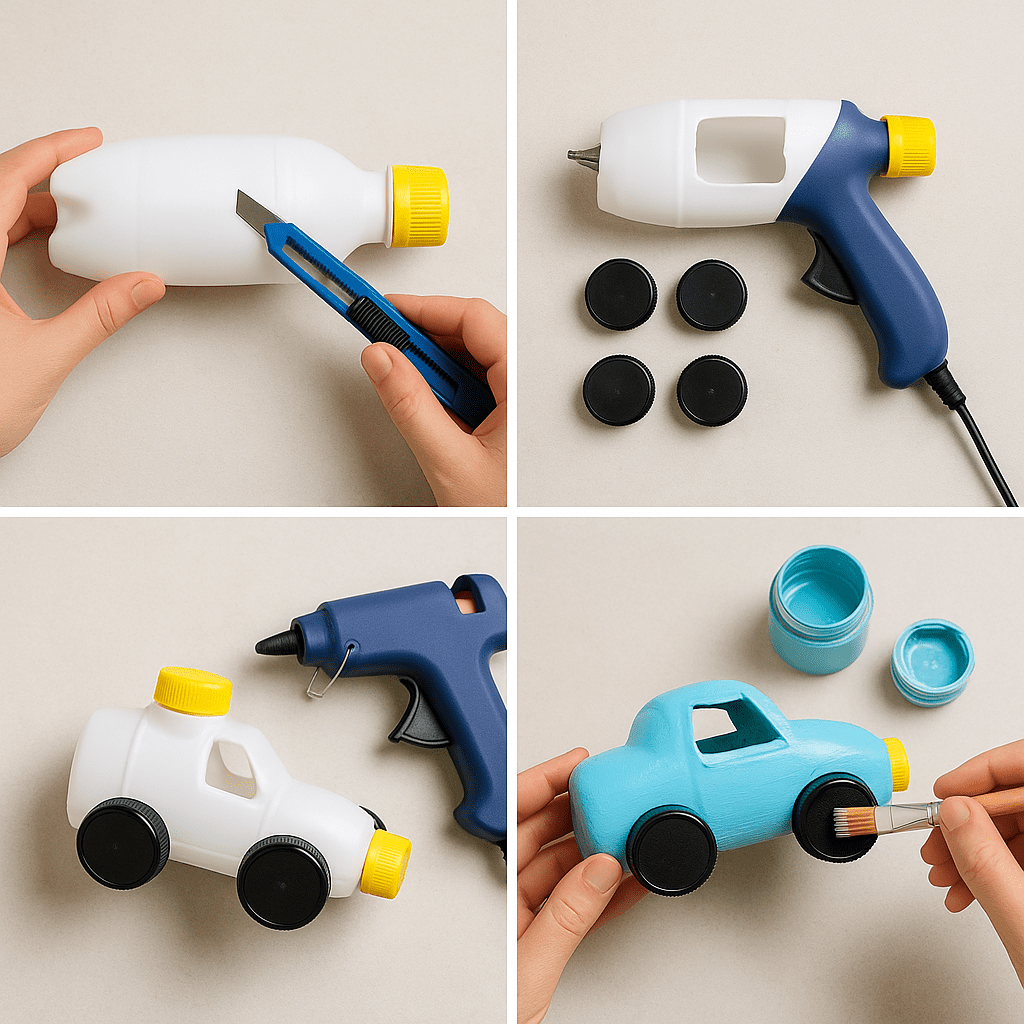
- One or two empty plastic bottles (500ml or 1L)
- Four plastic bottle caps (same size for wheels)
- Two wooden skewers or straight straws
- Scissors or craft knife
- Hot glue or strong adhesive
- Paint, stickers, or markers for decoration
- Optional: beads, buttons, or straws for added details
Step-by-Step Instructions
1. Prepare the Bottle
Clean and dry the bottle. Cut a rectangular window on the top if you want to create a convertible-style car.
2. Create the Axles
Insert wooden skewers or straight straws through the base of the bottle. You may need to poke small holes on each side.
3. Attach the Wheels
Glue one bottle cap to each end of the skewers. Ensure they rotate freely to allow smooth movement.
4. Decorate Your Car
Use markers, paint, or stickers to personalize the toy. Let kids unleash their creativity.
5. Test and Play
Place the car on a flat surface and give it a push. Make adjustments if the wheels don’t spin properly.
Educational Benefits for Kids
This DIY project is more than just fun. It helps develop:
- Fine motor skills from cutting and assembling
- Creativity through design and decoration
- Environmental awareness by reusing materials
- Basic engineering concepts like balance and movement
If you enjoy upcycling, don’t miss our guide on 10 eco-friendly ways to decorate with recycled glass jars to discover more sustainable home projects.
Safety Tips
- Always supervise children when using scissors or hot glue.
- Use child-safe paints and non-toxic materials.
- Avoid sharp bottle edges by sanding or trimming carefully.
Final Thoughts: A Toy That Teaches and Entertains
DIY toy cars from plastic bottles are more than just a weekend craft—they’re tools for learning, bonding, and sustainability. With minimal materials and maximum creativity, this project offers endless possibilities and encourages kids to reuse what they already have at home.
You can buy craft-safe glue guns and eco-friendly paints at Michaels, ideal for assembling and decorating your plastic bottle cars.
[…] Looking for more creative upcycling projects? Check out our guide on DIY toy cars from plastic bottles. […]