Creating masoCreating mason jar centerpieces using recycled materials is a smart, sustainable, and stylish way to decorate your home, events, or even outdoor spaces. Whether you’re hosting a rustic wedding, organizing a cozy dinner party, or simply refreshing your coffee table, mason jars offer a versatile and eco-friendly solution. Additionally, when combined with repurposed items, they allow you to reduce waste and showcase your creativity.
This guide will provide step-by-step instructions, creative design ideas, and practical tips to help you turn household scraps into beautiful centerpiece decorations.
Why Choose Mason Jars and Recycled Materials?
Mason jars are not only durable and reusable but also widely available and easy to work with. By incorporating recycled or repurposed items, you add a unique, personalized charm to each piece.
Here are a few compelling reasons to start crafting with these materials:
- Eco-friendly: Repurposes items that would otherwise be discarded.
- Budget-conscious: Cuts down on the need to buy new decor.
- Versatile: Works with many styles including rustic, vintage, modern, or seasonal.
- Beginner-friendly: Requires only basic tools and materials.
Instead of tossing out old fabric, corks, or ribbons, you can give them new life in your centerpiece design.
Recyclable Materials You Can Use
Before purchasing anything, take a look around your home for reusable supplies. Many everyday objects can be transformed into decorative accents:
- Empty mason jars (clear or tinted)
- Wine corks and bottle caps
- Scraps of fabric, lace, or burlap
- String, yarn, twine, or ribbon
- Pieces of broken jewelry
- Newspaper or pages from old books
- Pebbles, driftwood, or dried leaves
- Old greeting cards or printed tags
Pro tip: Mix materials with different textures—like wrapping lace over burlap or adding metallic elements—to create dimension and interest.
Step-by-Step Guide: How to Make a Mason Jar Centerpiece
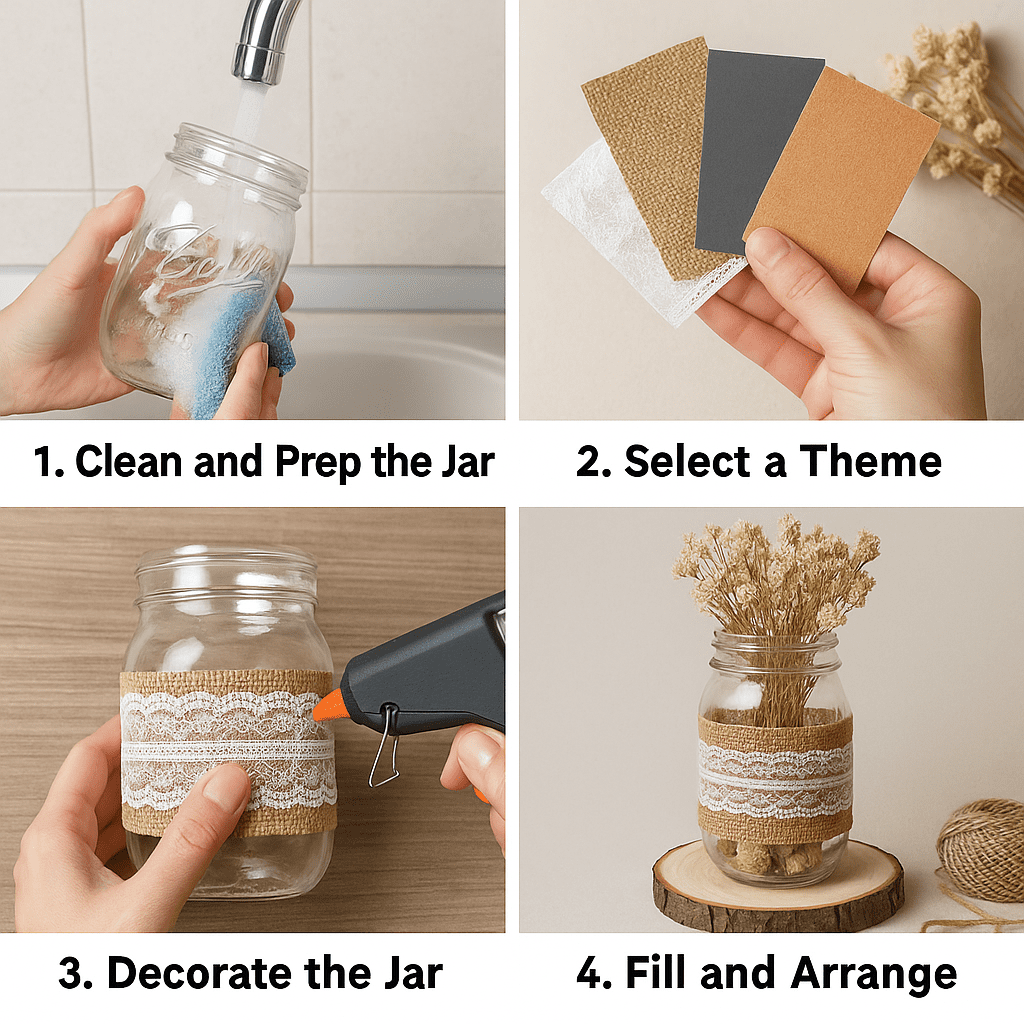
Step 1: Clean and Prep the Jar
First, wash the jar with warm, soapy water to remove any dirt or residue. Then peel off old labels or glue using vinegar or rubbing alcohol. Once dry, lightly sand the exterior if you plan to paint or attach decorations.
Step 2: Choose a Theme
Select a theme that complements your event or home decor. For example:
- Rustic: Combine burlap, dried flowers, and twine.
- Romantic: Use lace, pearls, and pastel tones.
- Modern: Paint jars with matte finishes and accent them with sleek metallics.
- Seasonal: Incorporate pinecones, autumn leaves, or mini pumpkins depending on the time of year.
Step 3: Decorate the Exterior
With your theme in mind, use hot glue or craft adhesive to attach the materials:
- Wrap twine, yarn, or ribbon around the jar’s neck.
- Affix buttons, broken jewelry, or bottle caps around the body.
- Apply decorative paper using decoupage techniques for a vintage feel.
- Add tags made from recycled paper with hand-written messages or names.
Design tip: Play with layering by combining different textures and tones for added depth.
Step 4: Fill and Style the Jar
Once decorated, it’s time to choose your filler based on the centerpiece type:
Floral Centerpieces
- Insert fresh or dried flowers.
- Use small stones, corks, or sand at the base for support and balance.
Candle Centerpieces
- Place a tealight, LED candle, or floating candle inside.
- Surround it with coffee beans, sea glass, or colored beads for visual appeal.
Themed Centerpieces
- Include seasonal objects like ornaments, mini fruits, or artificial snow.
- Line the inside with colored fabric or paper for contrast and background color.
You can enhance the display by arranging multiple jars (two to five) on a wooden tray, mirrored base, or rustic plank.
Tips for Longevity and Storage
In order to preserve your centerpiece for future use:
- Keep jars away from direct sunlight and moisture to prevent fading or damage.
- Store delicate elements separately in a box or container.
- Avoid gluing perishable items or those prone to degradation.
Furthermore, these decorations are easy to adapt for different seasons or events—just swap out fillers or outer materials.
Where to Display Mason Jar Centerpieces
Because of their flexibility, these centerpieces fit well in many environments:
- Dining tables for holidays or family gatherings
- Coffee tables or kitchen counters as everyday decor
- Outdoor spaces such as patios or picnic tables
- Wedding receptions and baby showers
- Gift tables, especially with handmade notes inside
Where to Buy Mason Jars and Craft Materials
Need additional jars or accessories? Visit craft stores like Michaels – Mason Jar Craft Supplies to find eco-friendly and affordable items to complete your centerpiece project.
Want More DIY Upcycled Projects?
If you enjoy transforming household waste into art, check out our guide to painting plant pots using recycled materials. It’s a great companion project to add color to your garden or home.
Conclusion: Crafting with Purpose and Personality
Making mason jar centerpieces using recycled materials is more than just a craft—it’s a chance to express creativity while practicing sustainability. These charming decorations can elevate any space or occasion with minimal cost and effort. Whether you’re planning a big celebration or simply want to refresh your decor, this project offers both inspiration and environmental value.
Save this tutorial for your next celebration—or share it with someone who loves DIY decor!
FAQ: Mason Jar Centerpieces Using Recycled Materials
Q1: Do I have to use traditional mason jars?
Not at all. Any clean glass jar with a wide mouth and stable base will work.
Q2: What glue is best for attaching decorations to glass?
Hot glue and craft glue are excellent choices. For heavier embellishments, opt for industrial-strength adhesives like E6000.
Q3: How can I make these centerpieces reusable?
Use non-permanent adhesives when possible, and keep the decorative elements separate from fillers that degrade quickly.
Written by Kate Smith | Plant Care Enthusiast & Urban Gardener
[…] For more creative ways to repurpose household items, check out our guide on how to make recycled mason jar centerpieces. […]
[…] more smart ways to reuse what you already have? Check out our easy tutorial on how to make recycled mason jar centerpieces — perfect for organizing or decorating shelves just like […]