If you’re looking for a budget-friendly and sustainable home decor idea, why not transform old CDs into stylish wall mirrors? This creative project gives new life to discarded discs, turning them into eye-catching reflective art. With just a few tools and a little time, you can create decor that’s both modern and eco-conscious.
1. Why Use CDs in Wall Art?
CDs may be outdated as media, but their reflective surface makes them perfect for decorative purposes. When broken into small pieces, CDs resemble tiny mirrors that can be arranged into stunning patterns.
This project not only recycles plastic waste but also adds a touch of sparkle and texture to your walls.
2. Materials You’ll Need
To get started, gather the following materials:
- Old CDs or DVDs
- Small round mirror or mirror base
- Strong glue (hot glue or E6000 recommended)
- Scissors (heavy-duty or craft snips)
- Cardboard or wooden base (optional)
- Safety gloves and goggles
- Optional: acrylic paint, beads, or glitter for extra flair
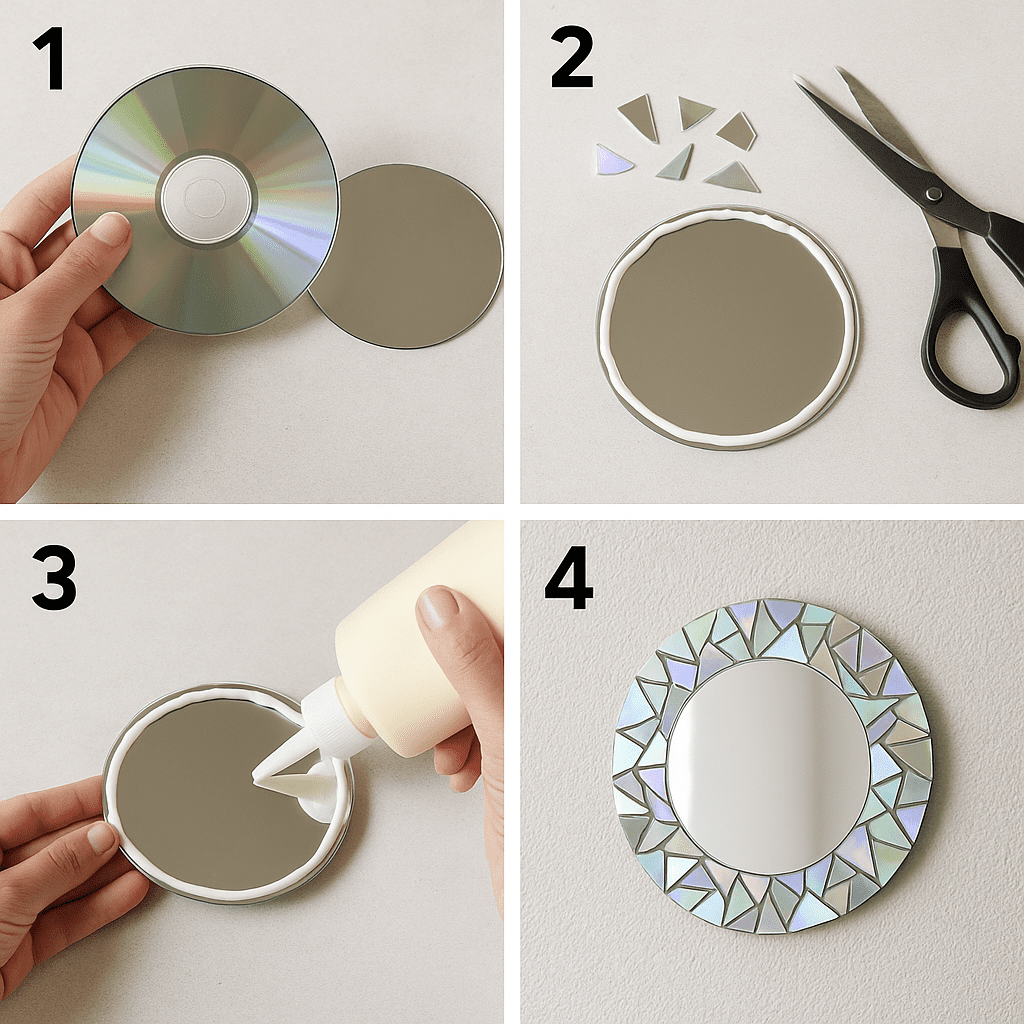
3. Step-by-Step Guide
Step 1: Cut the CDs
Wearing gloves and goggles, cut each CD into small pieces. You can create uniform squares or go for random shapes depending on your desired pattern.
Step 2: Prepare the Base
If you’re not using a ready-made mirror, glue a small round mirror onto a sturdy backing like cardboard or wood. Paint the base if you want to add a background color.
Step 3: Arrange the Pieces
Place the CD fragments around the mirror, forming a circular or mosaic pattern. Test the arrangement before gluing anything.
Step 4: Glue and Secure
Once you’re satisfied with the design, glue each piece in place carefully. Let it dry completely before hanging the mirror.
4. Design Variations to Try
This project is highly customizable. Here are a few ideas:
- Sunburst design: Use longer CD pieces radiating out from the center mirror.
- Framed look: Place CDs only along the edges for a clean finish.
- Color themes: Spray-paint the CD pieces before gluing them for a tinted effect.
- Double-layered style: Create two concentric circles of CD pieces for depth.
5. Safety and Hanging Tips
- Always handle CD fragments carefully; the edges can be sharp.
- Use strong adhesives to ensure longevity.
- Hang your mirror in a well-lit spot to reflect the most light.
- Avoid areas with high humidity like bathrooms unless sealed properly.
If you’re into upcycling, don’t miss our tutorial on DIY desk organizers using recycled jars—another fun and functional way to repurpose household items.
Conclusion: Turn Trash into Stunning Decor
With just a few old CDs and a little creativity, you can transform old CDs into stylish wall mirrors that brighten your space and reduce waste. This DIY is simple, affordable, and a great way to make your decor more personal and eco-friendly. Try it this weekend and give your walls a reflective makeover!
For high-quality adhesive and craft supplies, check out the eco-friendly options available at Michaels, a popular store for creative projects.
[…] Looking for more creative recycling tips? Don’t miss our guide on how to transform old CDs into stylish wall mirrors. […]